
English:
- APEX User Guide R019 R021 2020 0313 For APEX firmware R019 and above.
- APEX User Guide R018 2019 1025 For APEX firmware R018.
- GMOS JI100S User Manual ENG 0827 2015 For JI100S firmware version .65 and above
SpeedAngle R4 is a simple yet powerful tool to analyze your ride. With G force color-coded on the trace and its unique graphs of speeds, lean angles, and longitudinal G’s, it provides visual clues to help relive your riding motions, find your riding style, and improve your cornering skill. Hold your mouse key and drag to define an area to create an Area Report. You can download/upload/edit/save track settings from/to your device, or even edit the track setting directly on a recorded trace!
Please download SpeedAngle R4 below and unzip before use. Double click on the icon to launch it. No installation procedure is required.
R4 for APEX:
- Download R4 APEX R011 (for APEX)
- Download R4 APEX R011 User Manual
Change log 1202 2020 (R4 APEX 011): Added support of Line Length from 10M, 20M, 30M, 40M, 60M to 100M and fix some minor bugs. If your APEX firmware is R019 or above, this update is strongly recommended so that the Finish Line and Sector length can be shown correctly on map. For the change log of past versions, please click here.
R4 for GMOS JI100S:
- Download SpeedAngle R4 01.43 (0209 2017) (for JI100S)
System Requirement:
- Laptop Power Management: If you are downloading with your laptop, please make sure your battery management plan is set at HIGH PERFORMANCE. GMOS downloads at a speed 50 times higher than many UART devices to save download time. It requires the full capacity of the USB port. If your laptop is not set at high performance, you might encounter difficulty when downloading logs.
- Microsoft .NET Framework 3.0 and UP. You can go to Control Panel –> Uninstall a Program to check your .NET version. As long as your Windows is up-to-date, it will be fine.
- Mac Users: R4 can be run in Windows with Boot Camp or a virtual machine.
SpeedAngle R4 is an ongoing project. We will be adding more features to it periodically in the future. Please check back from time to time for the latest release.
View R4 tutorial videos below:
Interface Overview:
Connect and Download:
0:04 Connect with device
0:47 Change ID
1:07 Set file name format and download
2:35 Clear device memory
Load / Unload Logs:
0:04 Load logs
0:20 Unload logs
Replay:
0:04 Trace components and colors
0:38 Progress bar
0:58 Replay
1:30 Zoom in/out, move the map
1:49 Fix the map
Graphs:
0:04 Graphs overview
0:57 Zoom in/out, extending graph height
1:12 Hide a graph or Map Area
1:35 Match graphs of different logs
Dash:
0:04 Unload, hide
0:33 Set as Main trace
0:44 Dash components
1:18 Switch lap time between total time and running time
1:35 Dash menu
Select Single Laps:
0:04 Select single laps
1:02 Re-select single laps
Track Editor: Edit track setting of an existing log on its trace.
0:04 Enter Track Editor
0:19 Move a line, adjust its direction
0:39 Add a line
1:29 Remove a line
1:36 Save setting as a track file
1:50 Clear setting, discard and quit, apply and quit
2:04 Check new lap report
2:31 Save the edited log as a new log
2:49 Load a track file and directly apply to a log
Reports: Full Lap Report and Area Report
0:11 Open Lap Report
1:56 Create Area Report
Track Manager: Upload / Download / Create / Edit / Delete Tracks
0:04 Enter Track Manager, Manager overview
0:35 Line Editor overview
1:10 Load track files to Manager
1:35 Preview line contents
1:48 Upload tracks to device
2:11 Create a Finish Line from the start – Edit track name
2:32 Find coordinates with Google Earth
3:30 Adjust traveling direction
3:46 Repeat these steps to create sectors
6:54 Connect device and download tracks from device
7:06 Delete tracks from device
Setting Speed Unit and Download Speed:
Download the SpeedAngle SA to KMZ converter, and replay your ride 3D on Google Earth!
System requirement: Windows XP Service Pack 3 and above.
Download the model collection below if you want to have more fun and pick your own bike model color.
Models originally created by K…I…G…O…, uploaded to Google Sketchup 3D warehouse, modified by SpeedAngle Inc.
To visit the original model on Google Sketchup 3D warehouse, click here.
After download, double click on the file to start installation.
Mac users, please install the driver to your Windows with Boot Camp or a virtual machine.
=======================================================================
Download the latest firmware here and upload it to your device.
1. Download Firmware
Please choose one from below to download according to your model and location. Unzip before use.
APEX
-
DashApex R027
– THIS UPDATE IS RECOMMENDED FOR REGISTRATION NUMBERS FROM A2890824 TO A2891000, PLUS A2891609 AND ABOVE. (You can find the registration number at the back of your APEX.) Please unzip before use.
- It silently updates the sensor firmware when APEX is powered on with an R021 sensor connected. This new sensor firmware has a newly improved algorithm of lean angle measurement, especially in the mid range angles.
- The corresponding User Guide (same as R021): APEX User Guide R019 R021 2020 0313 .
-
DashApex R021
– (This is a previous version of R027.) This update includes the new features below and fixes a bug of R018. Please unzip before use.
- It allows users to set a track (1 Finish Line and up to 7 Sectors) manually on a track. With this feature, if you are on a track whose map is not in your APEX, you can set the Finish Line manually at the official Finish Line location besides allowing the timer to set it automatically for you where the starting speed is reached.
- It now supports 6 Line length. Besides the original 60M and 100M, it also supports 10M, 20M, 30M, and 40M. This is especially helpful if you are on a kart track or even a small temporary track.
- It also fixes a bug of performance mode which results in timer reboot when entering performance mode if a test record in memory has a certain error.
- The corresponding User Guide: APEX User Guide R019 R021 2020 0313 .
GMOS JI100S
2. Connect Your Device
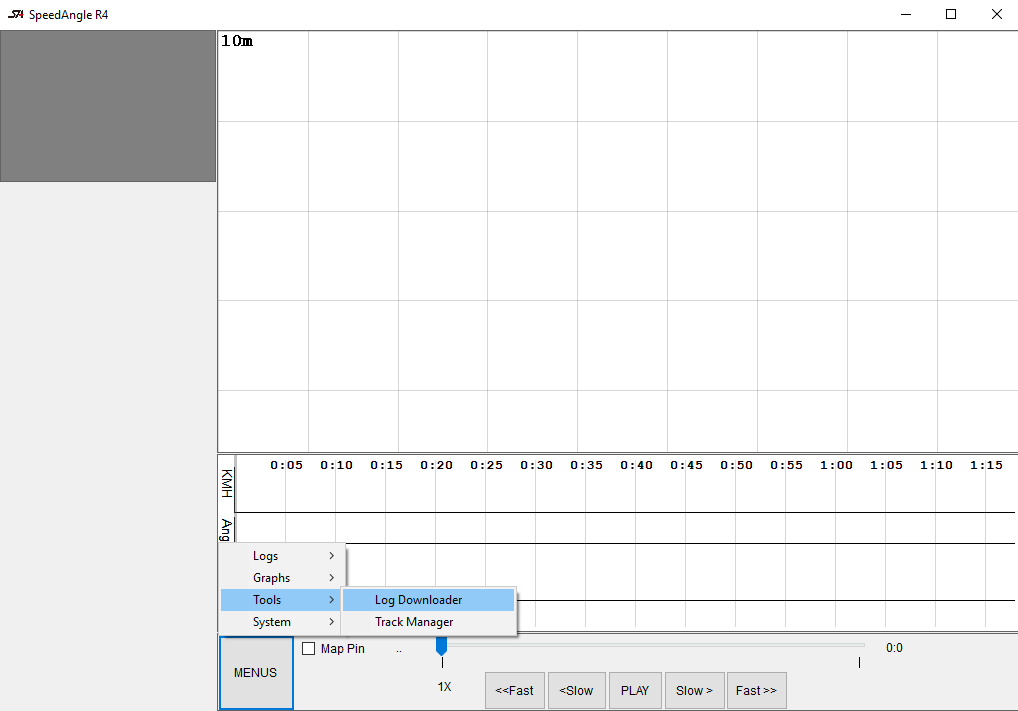
Launch SpeedAngle R4, go to MENU -> TOOLS -> LOG DOWNLOADER.
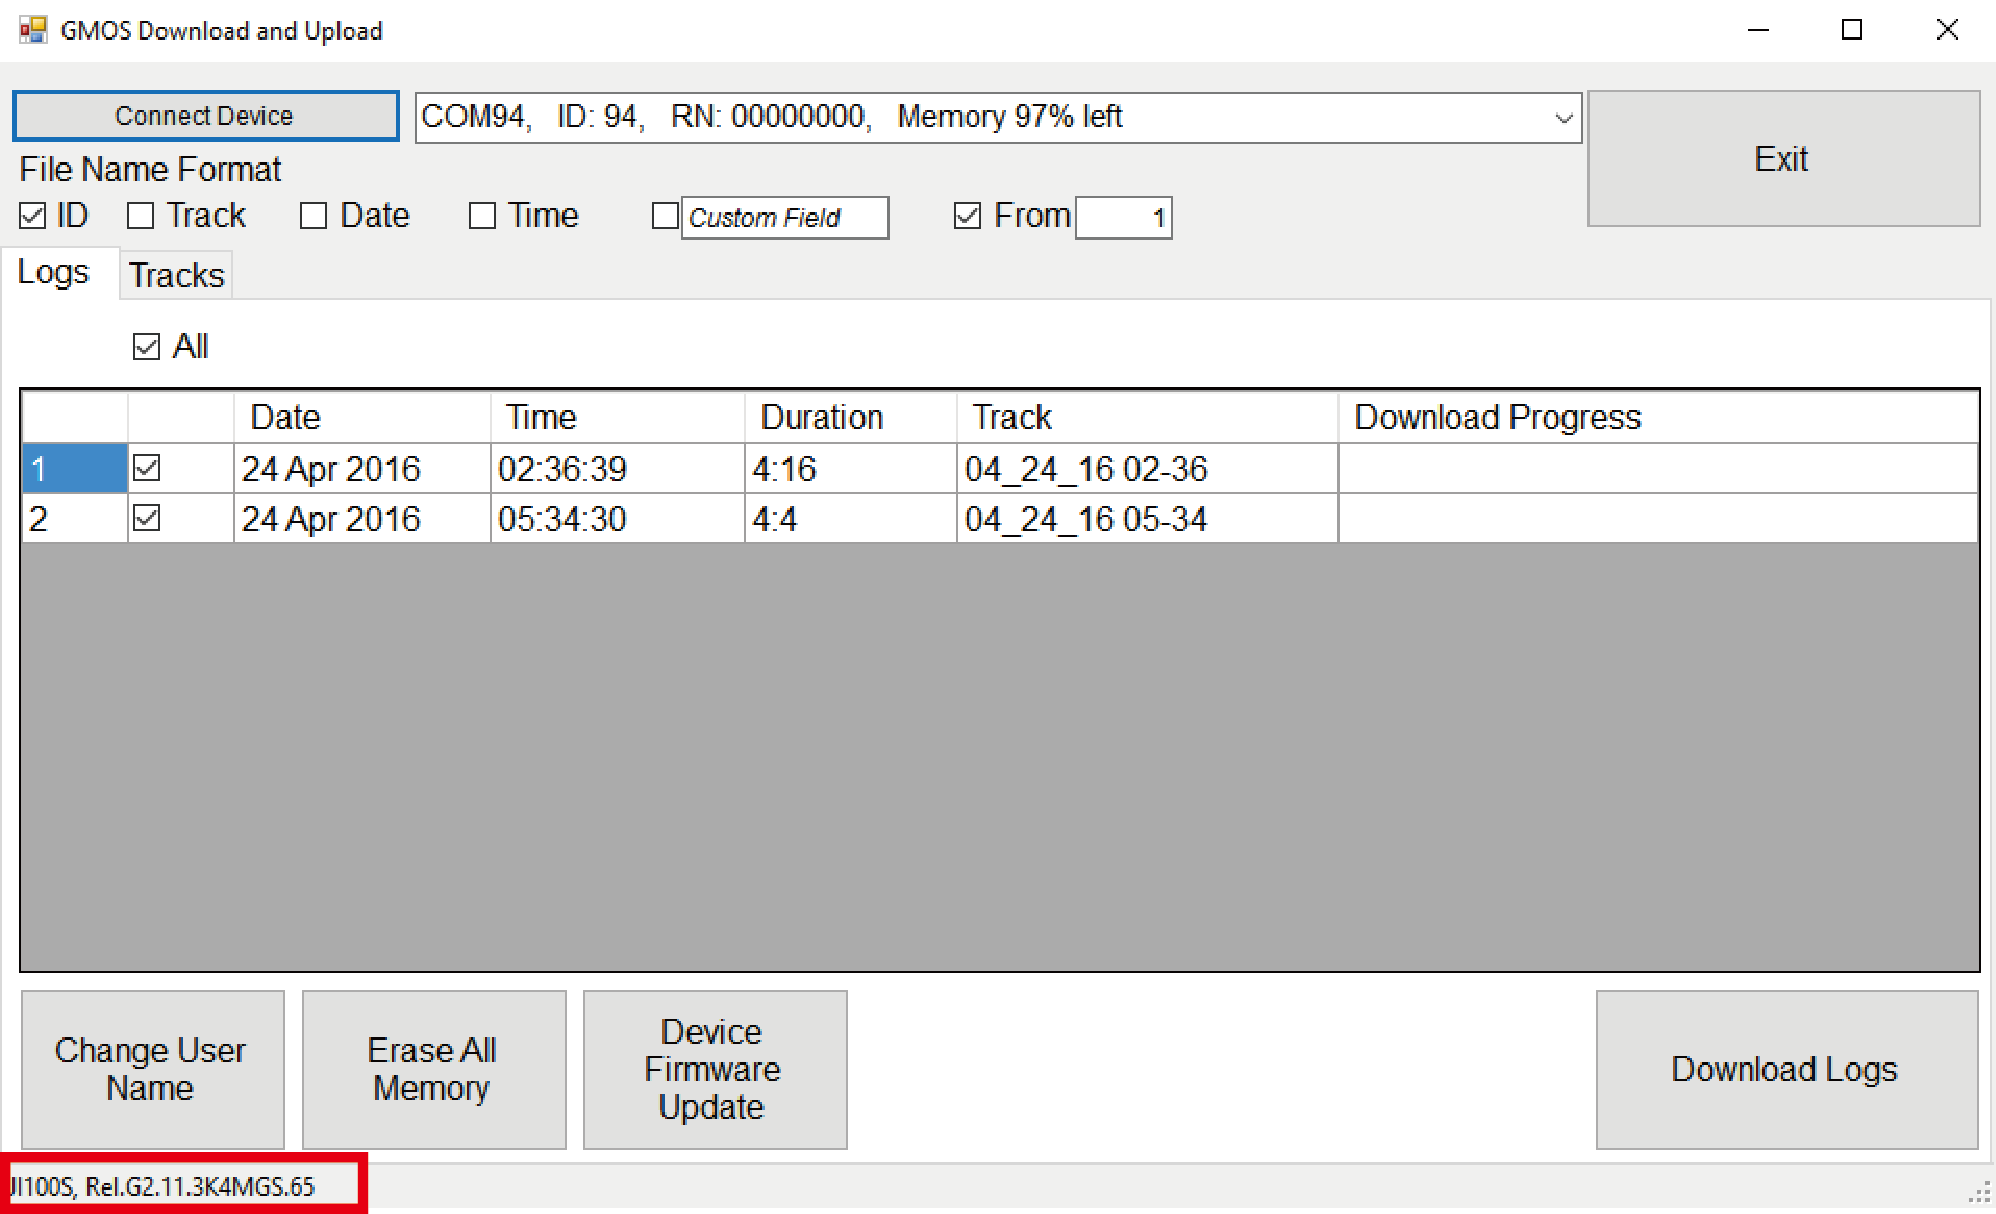
Click on “CONNECT DEVICE”. Once your timer has been connected, its firmware version will be shown at the bottom of the dialog window:
3. Upload Firmware
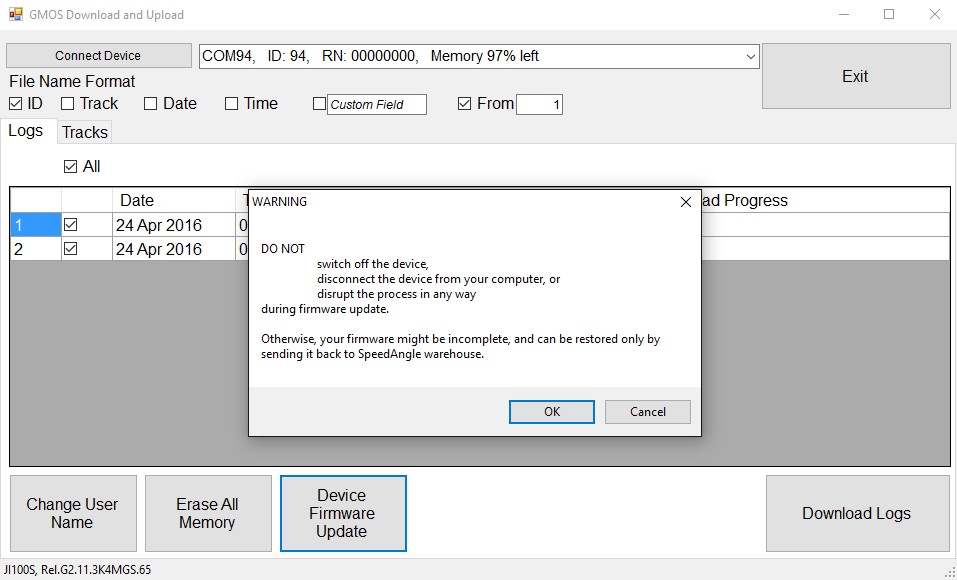
Click on “DEVICE FIRMWARE UPDATE” at the bottom. Read the warning message carefully, and then click OK.
Browse to find the firmware file you downloaded. The upload will take about 15 seconds. Once it is done, you will see “Firmware Update Success” beside the firmware version at the bottom of the dialog window.
During the update process, DO NOT power the device off, disconnect the device from the computer, or do anything that may interrupt the process. Otherwise, the firmware may be incomplete and can be fixed only by sending the device back to our warehouse.
That’s it!